How to use the IDEAS model

Inclusive curriculum design

Inclusive curriculum does not just happen. It requires purposeful design that takes account of the needs and strengths of all those who will be accessing it in order to create an equitable and socially just learning experience. This, in turn, requires the designers (you) to set aside your own assumptions about education and invest in truly understanding the perspectives of our diverse student body. 

Only through this process of developing empathy can we design a curriculum that is relevant and engaging to everyone, enabling every single student to feel a sense of belonging as an Oxford Brookes student.

“There’s a huge difference between ‘all are welcome’ and ‘this was created with you in mind.”

Dr Crystal Jones, 2019

Design thinking

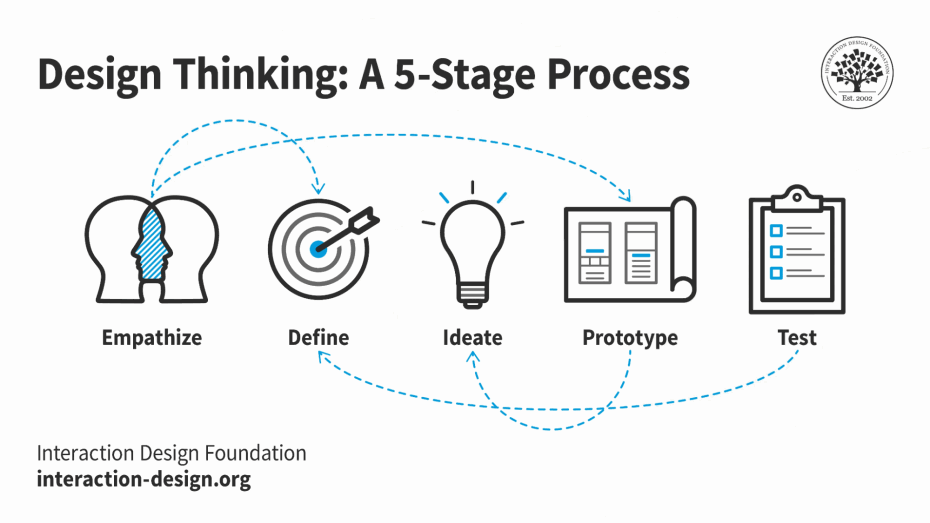
Design thinking: a 5 stage process - empathize, define, ideate, prototype, test

The IDEAS toolkit uses design thinking to structure the process of curriculum design because its positioning of empathy as the very first step places students at the heart of our curriculum. Through the stages of empathy, define (the problem that needs solving), ideate, prototype and test, it encourages us to design specifically for those students who have traditionally been excluded or disadvantaged by our curriculum. 

It also recognises that each programme is unique; it will attract different types of students and it will differ in which people it advantages or disadvantages. Design thinking supports you to unpack this and, through student partnership, to define the issues you want to work on and the aspects you want your programme to be known for.

Whilst design thinking places an emphasis on defining and solving ‘problems’, you are also encouraged to celebrate and share existing good practice.

The five stages of design thinking

The five stages of design thinking are highly iterative and flexible and may be repeated, run out of order, or run in parallel with each other. The stages are as follows:

Design stage Description
Stage 1: Empathy Research your students’ needs in order to gain an empathetic understanding of the ‘problem(s)’ you are trying to solve. This stage is vital in understanding who your curriculum is not serving in its current form and the reasons why.
Stage 2: Define State your students’ needs and problems. Gather your findings from the empathy stage and analyse them to define and articulate the core problems facing your students: these are your ‘problem statements.
Stage 3: Ideate This is the fun stage! Now you know your students and the ‘problem’ you want to solve, you can start to generate ideas. You are aiming for quantity, not quality of ideas and there are no rules here. It is usually helpful to cast aside for the moment any regulations that may restrict you. There are many ideation techniques that you can try.
Stage 4: Prototype

Experiment with the ideas you have generated by ‘prototyping’. This could take any form, such as:

  • drafting sections of the programme submission paperwork
  • sketching out an assignment brief (sketching here could mean drawing or writing)
  • creating a storyboard for your ideal student journey
  • using lego to design a classroom layout
  • drafting module descriptions on post-it notes and physically moving them into your desired order

The aim is to generate discussion and develop consensus on your best ideas.

Stage 5: Test Put your ideas into practice and evaluate them. Typically, this may result in returning to the ‘define’ stage, to define new problems, or redefine the original ones.

Putting design thinking into practice with IDEAS

The table below outlines a suggested process for curriculum design or redesign, using the IDEAS model to focus your approach at each stage.

You can use this approach independently, or you may wish to speak with OCAED (OCAED@brookes.ac.uk) about a personalised curriculum design workshop to support you in this process.

Design stageActionsSources of support
Empathy
  • Review the question sets for each element of IDEAS - these questions represent what research tells us students need.
  • Work with students to understand what they want and need from the curriculum, any barriers that exist for them, and any strengths they bring with them.
  • Where possible, bring internal and external stakeholders into the conversation. This could include prospective students, employers, professional bodies, DMeLDs, the Centre for Academic Development, the Careers Service, your academic liaison librarian, etc.
  • Gather data about your programme. Specifically, look for differential in the below:
    • Degree outcomes
    • Graduate destinations
    • Progression/continuation
    • Satisfaction (NSS/BSS/PTES)
    • Engagement (learning analytics)
Define
  • Respond to the question sets in the model and critically reflect on the picture this provides of your programme/module.
  • Refer back to what you learned from students and other stakeholders - where is there a mismatch between what you are offering, and what is needed?
  • Articulate the gaps in a number of ‘problem statements’.
  • Remember to celebrate the good here too - why not submit a resource or case study for inclusion in the toolkit?
Ideate
  • This stage benefits from a wide variety of perspectives - invite students, staff from CAD, the Library, Digital Resources, Careers, academics from other disciplines, employers, and anyone else you can think of!
  • Explore the IDEAS toolkit resources for inspiration, and conduct your own research/reach out to your networks.
  • Suspend reality and think outside the box. Make use of ideation techniques to support you and the team in generating as many ideas as possible.
  • Use a mix of collaborative and individual ideation techniques for the best results.
  • Each element of the has associated case studies and resources. Some of the resources include toolkits to help you ideate solutions for specific elements.
  • There are many guides to ideation techniques available online.
Prototype
  • Come together as a team to discuss your ideas and decide which to take forward.
  • ‘Prototype’ your best ideas. The aim of prototyping is to see how something would work in practice, but a helpful way to think of it in this context is to create a representation of your idea that helps you explain it to someone else. For example you could:
    • draft sections of the programme submission paperwork
    • sketch out an assignment brief (sketching here could mean drawing or writing)
    • create a storyboard of the ideal student journey
    • use lego to design a classroom layout
    • draft module descriptions on post-it notes and physically moving them into your desired order
    • draw a Moodle page
  • Spend some time interacting with each others’ prototypes, discussing how they would work in practice.
Test
  • Revisit the IDEAS question sets: would the students you envisaged in the emathise stage be supported by your answers?
  • Put your plan into action through the delivery of your new curriculum.
  • Evaluate your new curriculum. Use the touchpoints available to you such as module evaluation, BSS/NSS, and annual review to assess the impact you have made.
  • Adopt a model of continuous improvement, reflecting on your evaluation and making a new action plan where necessary. You may wish to revisit earlier stages of this process.